Here is a step-by-step guide on how to install and use FileZilla to connect for SFTP file transfer:
Step 1 - Downloading & Installing FileZilla
Download and install FileZilla from their official website at https://filezilla-project.org/download.php
Once the installation is complete, launch FileZilla.

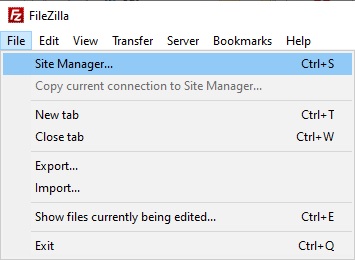
Step 2 - Accessing Site Manager
Go to the “File” menu and select “Site Manager”
Step 3 - Enter Connection Details
a) Click on the “New Site” button and enter a name for your site.
b) Under “Protocol”, select “SFTP – SSH File Transfer Protocol”.
c) Enter your server’s hostname (e.g. sftp.example.com), your SFTP username, and SFTP password.
Under “Advanced” tab, change the “Default Remote Directory” to the directory you want to access on your server.

Step 4 - Connect
Click on the “Connect” button.

FileZilla will connect to your server via SFTP and show the files and directories on your server in the “Remote Site” pane on the right-hand side of the screen.
Step 5 - Transfer Files
You can now upload and download files to and from your server by dragging and dropping them between the “Local Site” pane on the left-hand side of the screen and the “Remote Site” pane on the right-hand side of the screen.
To disconnect from your server, click on the “Server” menu and select “Disconnect”
Congratulations! You have now successfully installed and used FileZilla to connect via SFTP.